Software Review: Expense Manager For Android
This is a guest post by Samuel Marete. His day job is in finance, and one of the most conscientious people I have interacted with, and it shows in the level of detail displayed below . He blogs here, and he is @chrenyan on Twitter.
Choosing a Personal Expense Tracker
If you’re like me, you tend to do a lot of research before you jump into things. I have been known to have marathon 5-hour Googling sessions before buying something (helpful hint: Amazon user reviews are very useful!). Unfortunately I have carried this over into the App World, even though Apps are for free. I’m just not the type to try something coz it’s free, ditch it if I don’t like it, and start all over again. So when I was choosing an Android App for personal expense tracking, I looked at:
- Mint
- Expense Manager by Bishinews
- Toshl
- EasyMoney
- PageOnce
- YouNeedABudget
- Expensify
…among others.The top two, Mint and Expense Manager, really caught my eye. Mint because of the rave reviews (I think it is the most popular App out there), and Expense Manager because a very close friend spoke highly about it. I had settled on Mint, but – alas! – it was not available for Kenya. Perhaps a bit of rooting would have done it, but I am not brave enough to do that yet. So Expense Manager it was.
Setting Up Accounts
The key organizing object in Expense Manager is (naturally) the account. You can have as many accounts as you like. Personally, I set up 4 main accounts:
- A “Salary” account, where I record my payslip entries. The reason I do this is because expenses like Tax are not paid out of what hits the bank.Secondly, some expenses I incur are deducted direct from my payslip; without the salary account I’d have to load these expenses onto my bank balance and then re-subtract them. I find it easier to segregate these entries in a Salary account.
- A “Bank” account, where I record the transactions such as withdrawals, bank charges, cheques, and (hopefully!) deposits from my current account.
- An account I called the “Personal Expenses” account which equals the cash I have in my wallet. This is what I have to balance at the end of every day.
- A (self-explanatory)“MPesa” account.
You’re required to set the name of the account, the currency, and the initial balance in the account. Expense Manager also allows you to set a default account, which is useful because most expenses come out of one account (“Personal Expenses” in my case).
Expense Manager also allows you to change the order in which accounts appear. In my case the flow is Salary →Bank →Wallet →Mpesa so this is the order in which the accounts appear.
Once you’ve set up all your accounts, your “Home” screen will look like the example below. In the screenshot, the user has set up a “Personal” account and a “Checking” or current bank account.

Recording Transactions
Having set up the accounts, the next step is to transact! There are three types of transactions in Expense Tracker:
- Incomes – Cash into any account \o/, e.g.:
- My gross salary is an income into the “Salary” account
- When someone pays me back money I lent them I record it as an income, though technically this is not true (brainwave: I wonder if I can do it as a negative expense?)
- Transfers – These relate to funds that move from one account to the other. You simply state the amount, the account it’s coming form, and the account it’s going to. For example:
- When I have finished punching my payslip entries into the “Salary” account, I transfer what’s left (net pay) into my “Bank” account. Therefore my “Salary” account should always have a nil balance.
- When I withdrawvia the ATM, I transfer that amount from Bank to “Personal Expenses” i.e. my wallet.
- Deposits into MPesa are transfers from “Personal Expenses”, (or maybe in some cases the Bank) etc etc.
- Expenses. Cash out of any account /o\, e.g.:
- Tax is a deduction from the “Salary” account
- Haircuts is a deduction from the “Personal Expenses” account
- Airtime is often a deduction from my “MPesa” account.
Noting expenses means very little if you cannot categorize them. Expense Manager allows you to create your own Categories and Sub-Categories of expenses. It is important to think through these categorizations early on because when running reports (the moment of truth!) it’s these categories and sub-categories that are used to classify the expenses. Here are a couple of mine:
- Airtime
- Airtel Phone Voice
- Safaricom Modem Data
- Safaricom Phone Data
- Safaricom Phone Voice
- Bank
- Bank charges
- Grooming
- Haircuts
- Laundry
- Food
- Meals (breakfast)
- Meals (lunch)
- Meals (supper)
- Other
- Restaurant
- Snack
- Furnishing
- Appliances
- Bedding
- Transport
- Taxi
- Bus fare
Whenever you’re keying in an expense, the following screen appears:
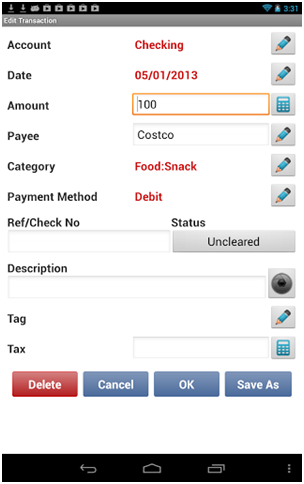
i. You begin by entering the account the expense affects.
ii. The date defaults to the current date, but you can change it (useful when you have backlogs).
iii. The Amount has a very useful calculator next to it, so for example if you are splitting a receipt from Tusky’s between food and other household items, you can add and subtract using the calculator and it’ll put the result of the calculation into the Amount field. The calculator is so easy to use that I never use the default typing facility for entering the amount.
iv. You can enter the Payee and Expense Manager will remember it for next time. The usefulness of this is that you can get to know how much you spend at different shops, e.g. Java, Nakumatt, Tusky’s, etc.
v. In the screenshot above, the Category is “Food” and the sub-category is “Snack”.
Running Reports
This is where all the fun is (or rather the moment of truth). I imagine the feeling you get when extracting reports is like that when stepping on the scales after aa couple of weeks of dieting/going to the gym. Expense Manager has several types of reports, e.g.:
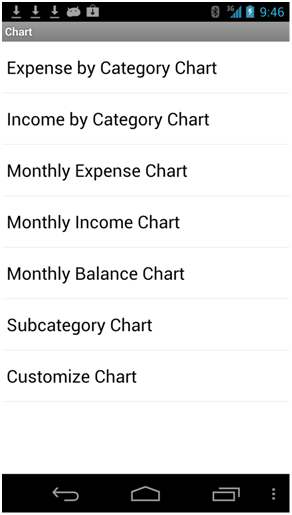
I tried some of the first ones, but now all I usually use is the Customize Chart. This allows me to set up what kind of report I’d want, using the following parameters:
- the period under the review,
- Whether I want to view expenses, incomes or balances
- Whether I want to view these by Category/by Month/etcetc
- A VERY IMPORTANT OPTION to exclude account transfers from the analysis as in most cases these are not expenses or incomes.
- ANOTHER VERY IMPORTANT OPTION to exclude initial balances as in most cases these are not expenses or incomes.
When you’ve set up your report, you have the option to view your reports as a pie chart, or a bar graph depending on what’s easier for you.
Initial Outcomes
One of the first things I discovered when I first ran reports was exactly how much I had been using on Airtime per month. It was a real shocker. Shortly after this, through friends, I discovered Postpay 1000. This is a SafaricomPostpaid product that allows you to access
- 900 On-Net minutes
- 100 Off-Net minutes
- 100 On-Net SMS
- 100 MB of Data
- 100 Bonga Points on sign up.
all at KES 1,000 per month. You can be sure that I signed up double-quick! So I have managed to control my costs on this already.
Discipline
It requires a bit of discipline to do all this, but for me the curiosity of where my money actually goes gives me the motivation to punch in the entries. Secondly the novelty of my first smartphone ever, out of which I feel compelled to extract maximum value, is another motivator. And it really doesn’t take me more than 5 minutes to enter my transactions every day.
I’ve been using the App for slightly over two months. In that period, the only amount I have been unable to allocate is KES 115. I don’t know where that cash went, and I’m still feeling bad about it.It feels like I was robbed! This is a negative incentive to not balancing the books each night – knowing I could have outflows I’m unable to explain.
In conclusion
To be honest, I haven’t fully utilized Expense Manager like it ought to be used yet. Expense Manager has the capacity to let you know if you are on track with your budget. I have a budget somewhere on Excel that I need to key into the Expense Manager. This way, the App will be able to automatically check whether I’m within budget on each category. Perhaps I’ll let you know how that goes in future.
That said,I’m satisfied with Expense Manager so far. It beats writing down on pieces of paper and/or keying into an Excel sheet every evening (something I’d done before) hands down. This is chiefly because I carry the phone with me everywhere so in a spare moment it’s easy to update my expenses, especially things I’m likely to forget, or complex entries (like split receipts). You may not settle on this particular app, but I strongly advise anyone with a smartphone to review various options and start tracking your expenditure using your smartphone as quickly as possible.
Happy tracking!


2 Comments